An impressive, yet approachable dessert you can make for your sweetheart to top off a special Valentine's Day meal.
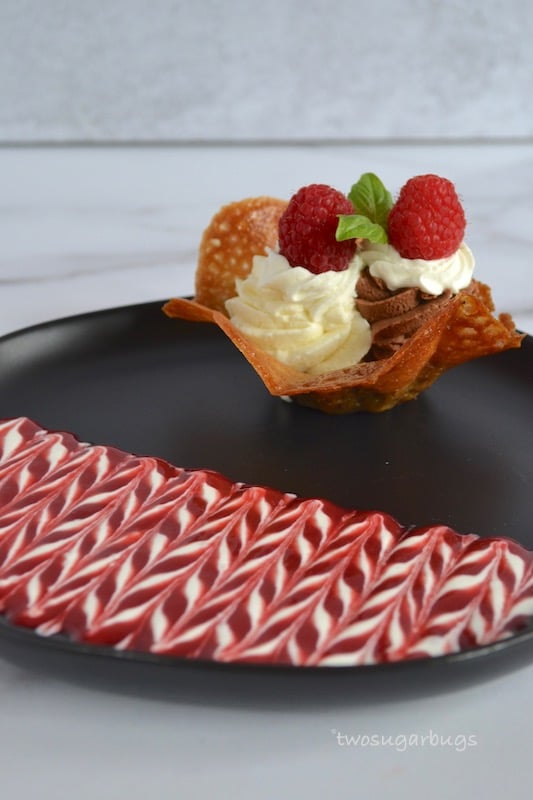
With Valentine's Day less than a week away, Mrs. Two Sugar Bugs has been kind enough to allow me, Mr. Two Sugar Bugs, to share one of my favorite dessert classics-white & dark chocolate mousse. Of course, since it's Valentine's Day, this calls for a little extra special touch with the addition of a ginger tulip cup and raspberry coulis. A little side bar about me...once long ago, in a galaxy far, far, away...oh wait, wrong story line.
Once long ago, I toiled away in the world of all things pastry. When Mrs. Two Sugar Bugs asked if I wanted to take a turn with a post for the blog, I couldn't help but reach back to one of my favorite desserts.

Disclosure | This post contains affiliate links. The price you pay as a consumer does not change, but I may make a small commission based on your purchase.
Chocolate mousse is a true classic and here I am reproducing it with some plating elements that you may choose to include in your final presentation. However, you may certainly limit your dessert to just the two mousses and you will still come away with high accolades from your lucky sweetheart.
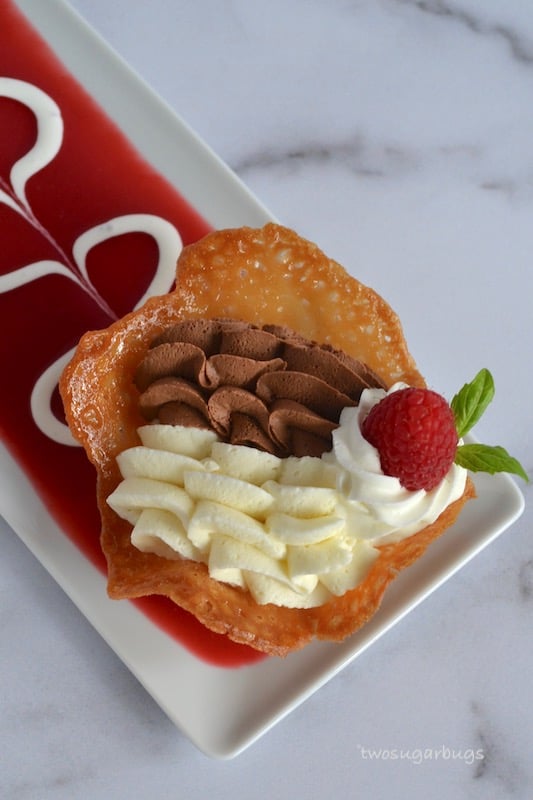
The richness of the dark chocolate mousse contrasts nicely to the light and airy sweetness of the white chocolate mousse. The crunchy ginger tulip cup provides the needed texture to the soft pillows of mousse. Finally, all of these flavors are brightened by the raspberry coulis that creates the dessert's base.

The best part about this recipe is you can make it ahead. Prepare a few days in advance of your big meal and then assemble it for a show stopping finale. Truly, this is a recipe anyone can take on and achieve stunning results the first time out.
May your Valentine's Day bring you the joy, laughter and love you seek with that special someone. Buon appetito!


White and Dark Chocolate Mousse with Ginger Tulip Cups
Ingredients
White Chocolate Mousse
- 3 ½ ounces White Chocolate Callebeaut or other quality chocolate
- ¾ cup Heavy Whipping Cream
- 2 large Egg Whites
- 1 ounce Granulated Sugar
Dark Chocolate Mousse
- 3 ½ ounces Dark Chocolate Callebeaut or other quality chocolate
- ¾ cup Heavy Whipping Cream
- 2 large Egg Whites
- 1 ounce Granulated Sugar
Ginger Tulip Cups
- 1.5 ounces Unsalted Butter Softened (this is a little over ⅓ stick of butter)
- 3 ¾ ounces Honey Your favorite honey is fine
- 3 ¾ ounces Granulated Sugar
- 2 ounces Cake Flour Sifted
- 1 pinch Ground Ginger A little goes a long way in this recipe.
- 1 tablespoon Melted Dark Chocolate Optional (for bottom of cups once baked)
Raspberry Coulis
- 1 bag Frozen Raspberries
- 1 tablespoon Corn Starch
- 3-4 tablespoons Granulated Sugar The amount of sugar will depend on the natural sweetness of your raspberries.
- 6-8 drops Water Use enough water to make a slurry
Garnish
- 1 sprig Fresh Mint Optional
- 1 tablespoon Whipped Cream Optional
- 1-2 tablespoons Sour Cream or Creme Fraiche Optional (for creating designs in Raspberry Coulis)
Instructions
To Prepare the Mousses:
- You will follow the same technique for both the white and dark chocolate mousses. I usually start with the white and then proceed with the dark mousse, but you may do them in whatever order you please.
- Place a pot of water on your stove and bring to a soft simmer. Rough chop your chocolate (whichever one you are using first) and place in a non-reactive bowl. I prefer to use either stainless steel or pyrex type glass bowl for this. Place your bowl with the chopped chocolate on to your simmering pot of water and stir using a rubber spatula or wooden spoon until the chocolate is melted. Do NOT overheat your chocolate while doing this!
- I recommended you remove the bowl from time to time off of the pot of water and stir your chocolate ensure no overheating occurs.
- Once completely melted, set chocolate aside and proceed with the other ingredients.
- Using a stand mixer with the whisk attachment or hand-held mixer, whip the heavy cream on high until moderately stiff peaks form. You want your heavy cream to be whipped well enough that it will hold its shape but not so over whipped that it will be hard to fold into the chocolate and meringue mixture. Once whipped, set aside in the refrigerator to keep cool.
- After cleaning your stand mixer bowl or obtaining a fresh bowl, ensure there is no residue on the bowl or the whisk. Place your egg whites in the bowl and whisk on high for thirty seconds or so, then reduce the mixer’s speed to low and add your granulated sugar. Continue again on high speed until your egg whites form moderately stiff peaks. They should appear glossy and stand up when pulling the whisk out of the meringue.
- Now for the fun part. Retrieve the whipped cream from the refrigerator and have it ready nearby. Taking a rubber spatula, pour the melted chocolate into your egg white meringue and fold over the egg whites with the chocolate. Ensure the chocolate and egg whites are well incorporated but do not “beat them” together. The goal here is to keep as much of the air in your meringue as possible while ensuring your chocolate is well emulsified into your whites. Once this is done, and speed is of the essence to prevent the chocolate from clumping and forming unsightly lumps, then fold your whipped cream into the chocolate meringue mixture. Follow the same technique you did with the egg whites and chocolate.
- Now you should have a well incorporated, light and airy white (or dark) chocolate mousse. You may place this in a covered container for up to three days before serving. In order to avoid the mousse from attracting odors from other items in your refrigerator, it is strongly recommended to cover in a clear cling wrap or in an air tight container. Now repeat this process for your second mousse.
- Pro tip: I whip up the entire amount of my whip cream at once for both my mousses and then visually cut the mixture in half and place in two bowls. This will save you a step in the process when making both mousses.
- You can stop here if you wish and not proceed any further. You can scoop the mousses into wine goblets, small bowl, etc and delight your sweetheart or you can take it up a notch or two and deliver the full experience.
- If you’re the adventurous type, read on ~
To Prepare the Ginger Tulip Cups:
- Preheat your oven to 375F.
- First off, I use fluted brioche molds to create the shape for the ginger tulip cups. While I have found these to give the best results for the finished look I want, you in no way have to use these yourself.
- Find a similar shaped object(s) that can be used such as a small metal bowl, small pyrex custard glass bowl or some other similar sized vessel that is also heat resistant and will not melt from the heat of the tulip cups when placing them on your chosen object straight from the oven.
- Using a stand mixer with paddle attachment or hand-held mixer, cream together your softened butter and granulated sugar. Turn your mixer to low speed and drizzle in your honey.
- Once all your honey is in the mixing bowl, turn your mixer on to high and cream for 1-2 minutes.
- Now add your remaining dry ingredients on low speed and mix until well incorporated. Your mixture will have a somewhat granular appearance. Place your mixture into a covered container of your choice or a bowl covered with clear cling wrap. This can be left out at room temperature for up to one week prior to use.
Baking Your Ginger Tulip Cups:
- Prepare a ½ sheet pan/jelly roll pan lined with parchment paper. I have found better results using parchment paper than using silicone baking mat for the next step in the process. You will need to create a fair amount of space on your counter top or island for moulding the cups.
- Have your brioche moulds (turned upside down if using) or other vessel of choice laid out on the counter ready to go.
- Using a tablespoon, large spoon or small ice cream scoop #40, measure out and equally space your batter to make the number of desired tulip cups. A side note on sizing of tulip cups—if you prefer small cups, by all means use a smaller measuring size #60 or even #100 and then split your mousses into two different cups if you prefer.
- If I’m making for more than 2-4 servings, I usually prepare at most six per sheet pan to allow for adequate spreading of the batter when baking. However, it is important to note to only prepare as many cups at a time for as many molds that you have (i.e.- if you only have two molds, only bake two cups at a time.)
- Bake cups in preheated 375F for about ten minutes. The batter should be a deep golden brown throughout. The cups will spread on the sheet pan and approximately triple in diameter from their portion size. Remove sheet pan with cups from the oven and place on your counter or surface that contains your brioche mold(s) or other similar mold(s).
- Now if you don’t have baker’s hands or other calloused hands, you may want to use a set of gloves for the next step as you will be working with very hot items.
- Grab the edges of your parchment and in a quick motion flip over and onto your clean counter.
- Your tulip cups should now be face down on the counter with the parchment paper on top of them. Slowly lift off the parchment paper from the tulip cups.
- You may find you need a thin blade spatula or knife to help remove them if they are sticking to the paper. Once free from the paper, quickly grab an edge of one of the cups and lift off from your surface and place on to the mold.
- Using the palm of your hand, gently shape onto the mold and allow to cool in place. Repeat for any remaining cups.
- Allow the cups to cool and harden in place, usually five minutes is sufficient. Once hardened, remove them gently from the mold and place on a plate or tray until ready to assemble the dessert.
- Prior to assembly, you may coat the bottom of each cup with melted dark or white chocolate using a small brush. This is an optional step that provides both a level of flavor and protects the cup from getting soggy when sitting on the raspberry coulis.
To Prepare Raspberry Coulis:
- In a medium sized saucepan set over medium heat, place your frozen raspberries in the pan and bring to a low simmer.
- While the berries are heating, prepare your thickener slurry. In a small bowl, place a tablespoon of corn starch and add some water to it to make you slurry.
- Once the raspberries and soft and most of the their liquid has been released, you may add your granulated sugar to the raspberries and stir to incorporate.
- If using an immersion blender, place in the saucepan and blend your raspberry and sugar mixture until smooth.
- If using a traditional blender/food processor, transfer your raspberries and sugar mixture to that and blend until smooth. Then pour back into your saucepan.
- Now with the heat on low, add your cornstarch slurry and continue cooking until mixture has thickened and coats the back of a spoon, about three to five minutes should suffice.
- Next, using a Chinoise or cheese cloth, strain your thickened raspberry mixture to remove the seeds. Chill your raspberry coulis for at least two to three hours prior to serving. You can make this up to five days in advance.
Plate Presentation:
- Using a sauce bottle or ladle, pour about three tablespoons (this will depend on plate size) on to the plate and slowly angle your plate in all directions to allow the sauce to cover the inside surface.
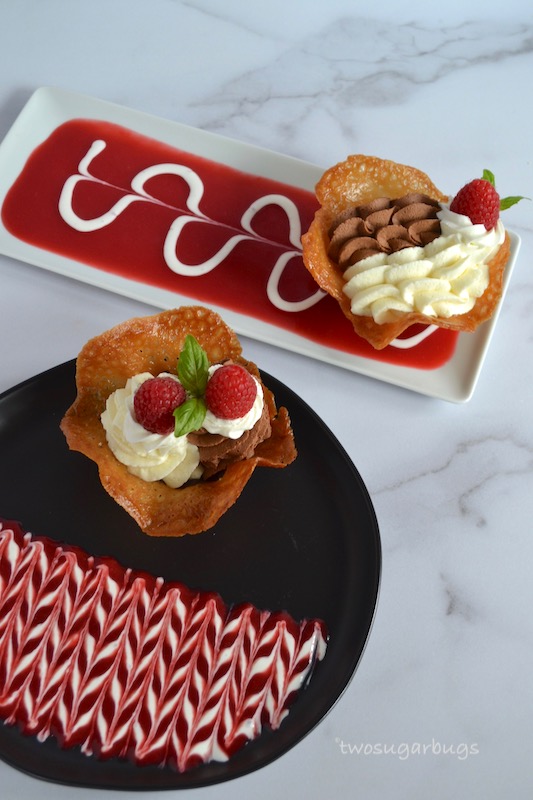
- If wishing to create a design, you can thin some sour cream with water or use creme fraiche and using a sauce bottle with a thin tip add dots or lines into raspberry coulis.
- Using a toothpick or skewer, draw through your dots or lines to create heart shapes/patterns as you prefer.
- Place a completed ginger tulip cup on top of the sauce and then using a fluted tip and pastry bag, pipe in your white mousse followed by your dark chocolate mousse.
- You can do rosettes, sea shells or any type of pattern you prefer. Likewise, you can use a straight tip and have no design in the mousse if you prefer.
- Top each cup with a dollop or rosette of whipped cream and a sprig of mint to finish. Serve and enjoy with your sweetheart!
Notes
DID YOU MAKE THIS RECIPE?
Be sure to tag @twosugarbugs on Instagram and hashtag #twosugarbugs



Nicolas Hortense
Love everything about this! The cups, the mousse, the pipework..well done!!
Tasia
Thank you so much for the kind comment Nicolas!
Jennifer
These look wonderful, Tasia!!
Tasia
Thank you so much Jennifer! They are always a hit when we make them.