

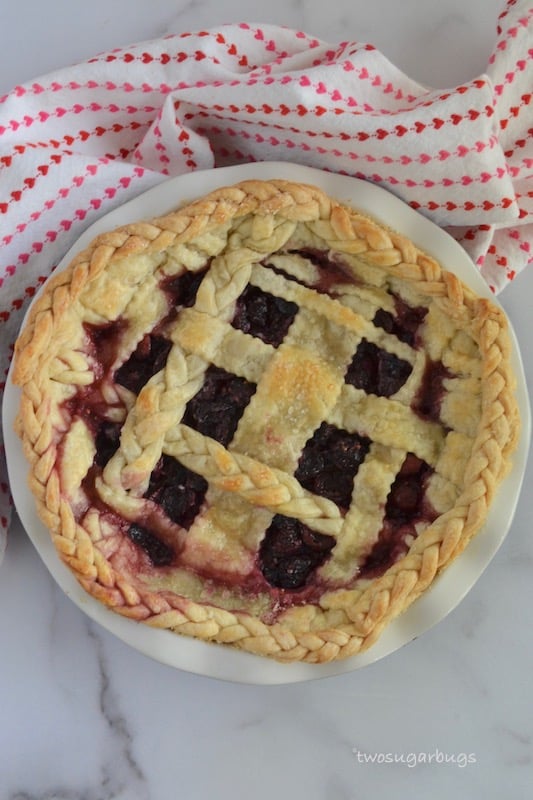
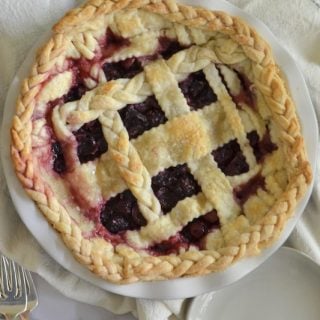
Two of summer's gorgeous fruits combine the best of sweet and slightly tart in this blackberry and cherry pie.
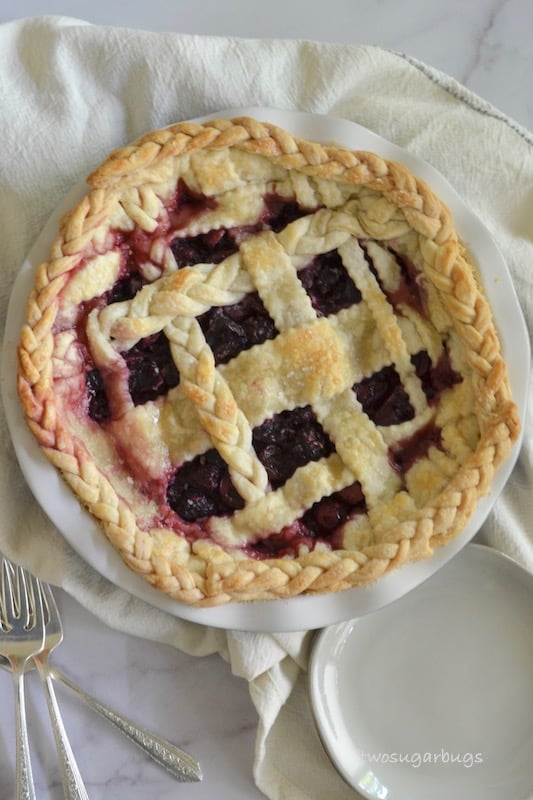
Summer just wouldn't be complete without pie. It seems to be an American staple. Blackberry and cherry pie is a fabulous way to bring two fruits that scream summer together in a perfectly sweet and slightly tart treat.
Blackberries are well known in the Pacific Northwest. They grow like weeds everywhere! I grew up picking blackberries from the wild bushes around my house. I fell in love with the sweet and sometimes tart berry.
Disclosure | This post may contain affiliate links. As an Amazon Associate I earn from qualifying purchases.
Washington cherries are also well known. My family loves to pick multiple pounds of the sweet Bing cherries every summer. I am contemplating adding "professional cherry pitter" to my resume! 😉 Enough about that though, let's get to making this blackberry cherry pie!
HOW TO MAKE BLACKBERRY CHERRY PIE
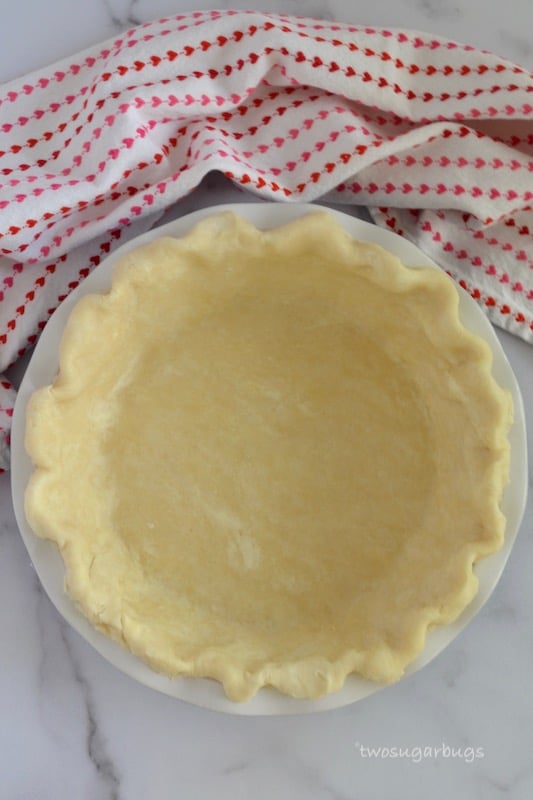
First you will make a double batch of my perfect all-butter pie crust. The pie dough needs to chill for a minimum of one hour prior to rolling out, but can be made up to several days ahead of time. If you make the dough a few days ahead of time, let it sit at room temperature for about 10 minutes prior to rolling.
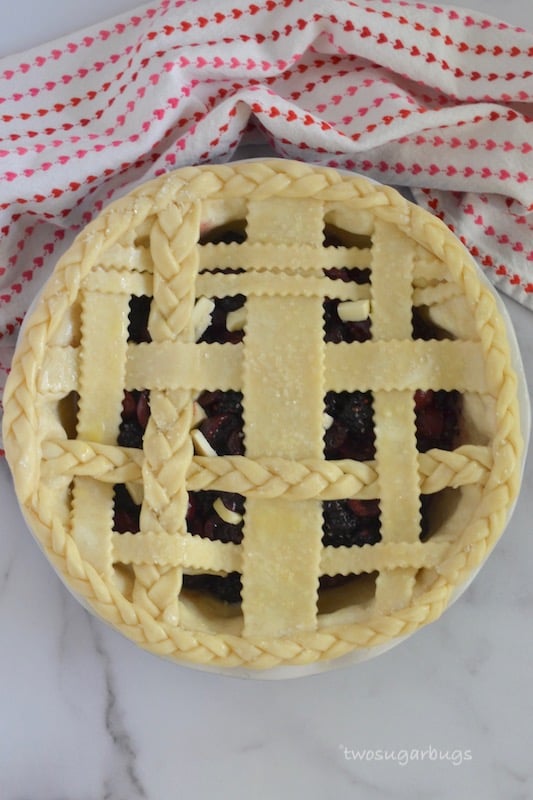
I have fun being creative and making a lattice top, but it's not necessary. You can simply roll out the top crust in a circle, drape it over the filling and crimp the edges. Be sure to cut several slits in the top of the dough. This is to create air vents so that the pie can breathe as it bakes.
MAKING A LATTICE TOP
Roll one pie dough disk into a 12 inch circle and fit it into the bottom of your pie plate. I use my Emile Henry plate, which I love (not sponsored, just a fan)!! This pie plate is a deep dish, so it's not the most ideal for this pie. If you are using a deep dish pie plate, you may need to increase the amount of berries used.
Roll the second dough disk into a 12 inch circle. Then use a pastry cutter to create strips for your lattice.

I like turn my pie plate upside down on a piece of parchment paper and use a pencil to draw around the edge. Then turn the parchment paper over (with the pencil marking down) and use the circle as a guide for making the lattice top. You can be as simple or as fancy as you want to be with this. I like to cut varying widths of dough and sometimes I braid a couple. You have plenty of dough to get as creative as you wish. Once you have all your lattice strips prepared, lay them out over the parchment paper and weave them together. Once you are happy with your design, transfer the parchment paper to the refrigerator. Let it chill until it's time to use it.
MAKING THE PIE FILLING
Next, gather your filling ingredients. I typically use Bing cherries, but any variety will work. If you use pie or sour cherries, you will want to increase the sugar by at least a ¼ cup.
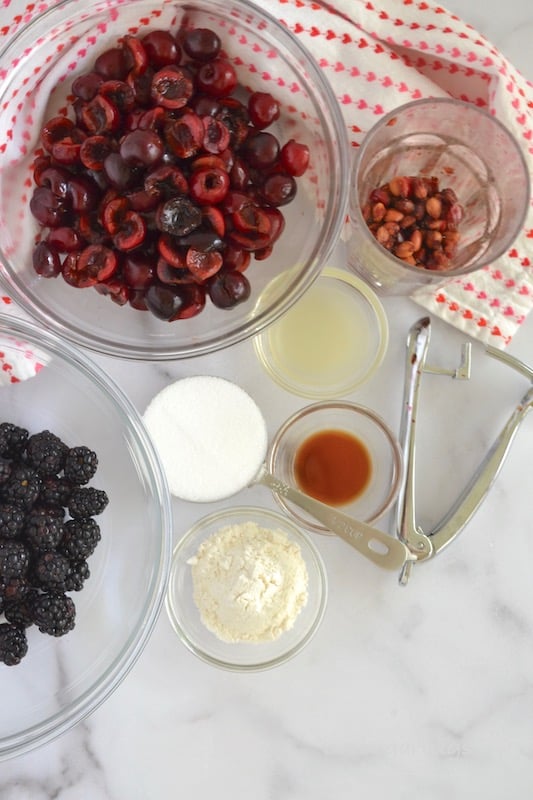
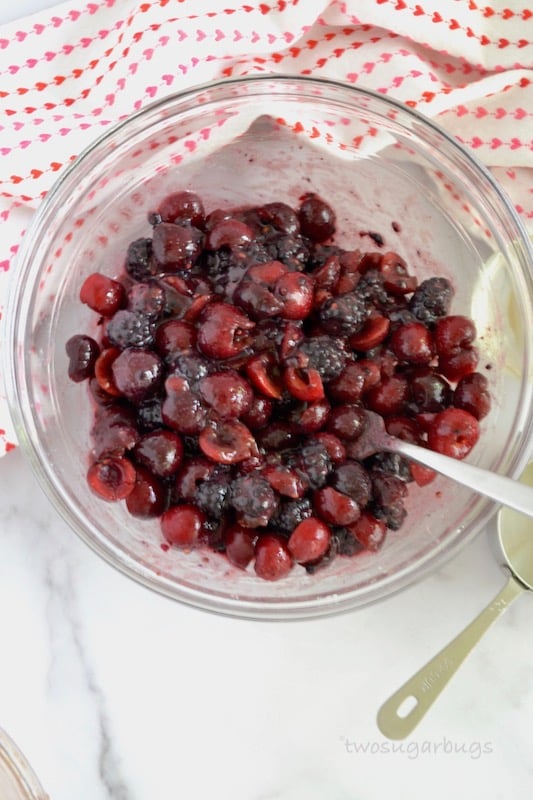
Toss the blackberries with the sugar, flour, lemon juice and vanilla. Lightly mash some of the blackberries; then add the cherries and toss it all together.
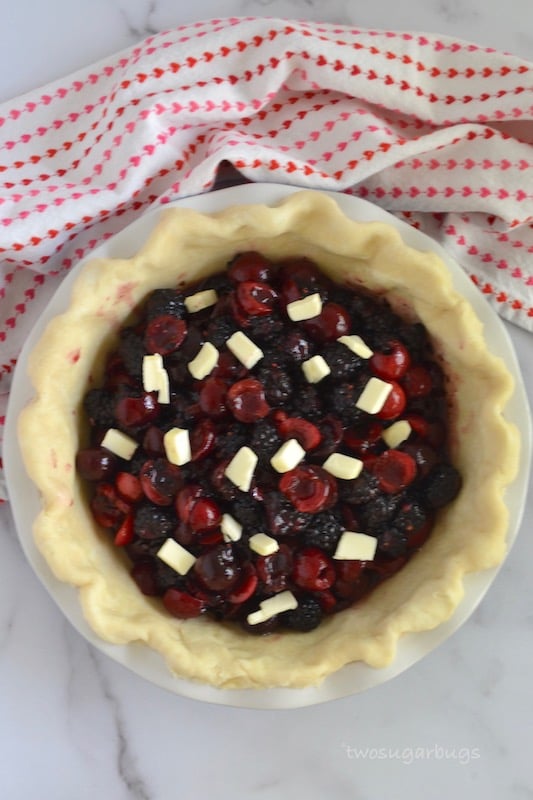
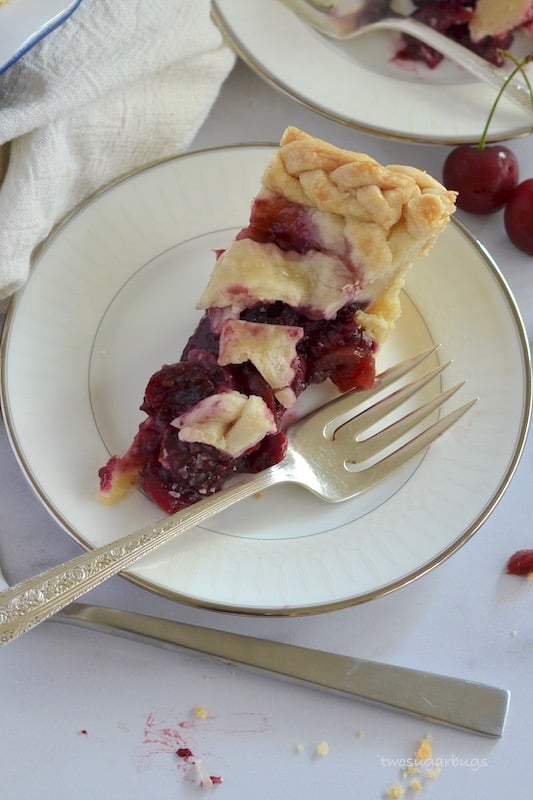
Next you will add the blackberry and cherry filling to your prepared pie plate. Be sure to discard any juices left in the bottom of the bowl. I like to use a slotted spoon to transfer the filling. Top the filling with small pieces of butter and then the lattice (or other) top crust. Brush the crust with an egg wash and sprinkle with coarse sanding sugar, if using.
Place the prepared pie in the refrigerator to keep cold while the oven preheats.
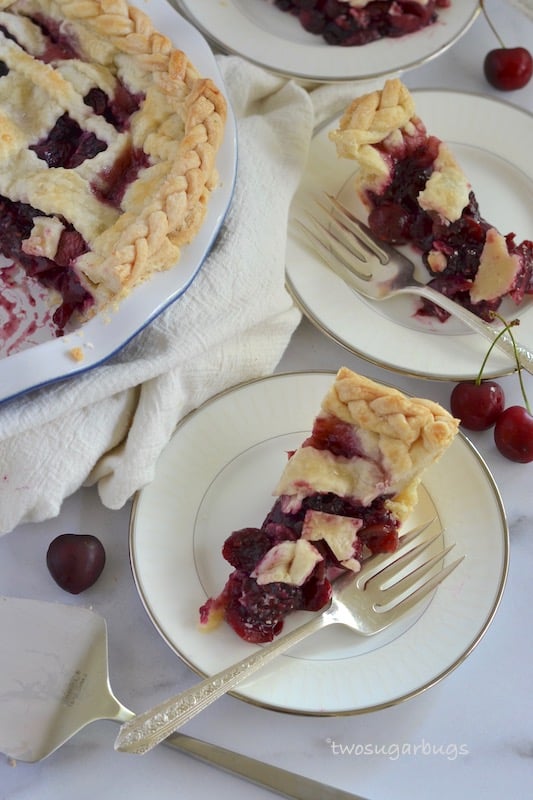
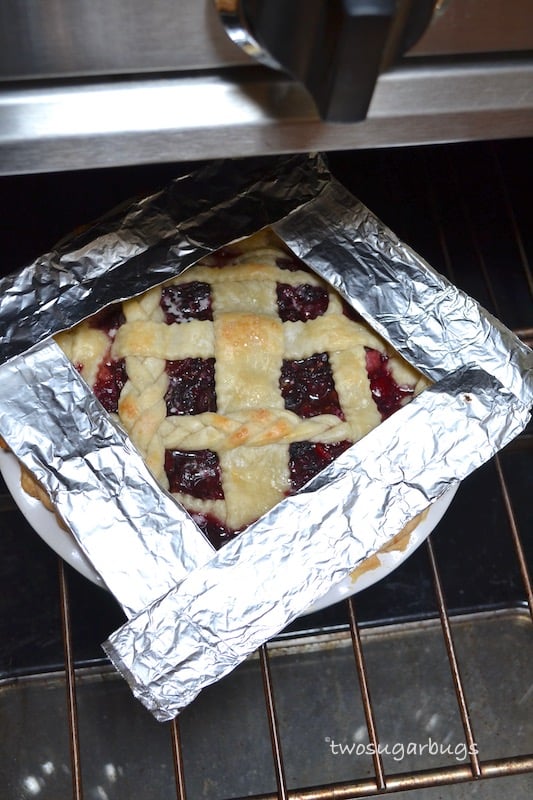
Then bake the pie for about 1 hour and 15 minutes, until the crust is golden and the filling is bubbling. I recommend checking the pie 30-40 minutes into baking to make sure that the edges are not browning too quickly. You can use a pie shield or super-fancy shields like I use to cover the edges, if needed.
Finally, allow the pie to cool for a minimum of four hours at room temperature. This will allow the filling to thicken.
WHAT TO DO IF YOUR FRUIT PIE HAS TOO MUCH LIQUID AFTER BAKING
The filling can be more liquid-y depending on the juiciness of your fruit. If this happens, you can use a clean turkey baster to slurp up excess juice. You can also carefully tilt the pie plate to discard extra juice.
HOW TO STORE BAKED FRUIT PIES
Blackberry cherry pie can be prepared a day before and left at room temperature overnight.
Cover any leftovers tightly and refrigerate for up to 5 days.
FRUIT PIE RECIPES FROM SOME OF MY BLOGGER FRIENDS
- Mint Chocolate Cherry Galette from Leanne at Crumb Top Baking
- Strawberry Rhubarb Pie from Jennifer at Beyond the Butter
- Very Berry Streusel Pie from Dee at One Sarcastic Baker
To pin this recipe, you can use the button on the recipe card, or on any of the photos in this post. Happy baking!
Blackberry Cherry Pie
I highly recommend using weight (metric) measurements when available for more accuracy and the best results.
Please note
When using 2x or 3x ingredients, the grams in parenthesis DO NOT adjust, you will have to manually do that.
Ingredients
- Perfect All Butter Pie Crust double batch
- 2 ½ cups cherries pitted and chopped
- 2 cups blackberries
- ⅔ cup granulated sugar (133g)
- 3 tablespoons all-purpose flour (24g)
- 1 tablespoon lemon juice (15mL)
- 1 teaspoon pure vanilla extract
- 1 tablespoon butter (14g) cut into small pieces
- Egg wash - 1 large egg and 1 tablespoon milk
- Coarse sanding sugar if desired
Instructions
- Prepare Perfect All Butter Pie Crust (double batch)
- After dough has chilled, roll out ½ the dough to a 12 inch round. Transfer to a 9" pie plate (preferably not a deep dish) and place prepared pie bottom in the refrigerator. Roll out the second half of the dough to a 12" round and cut into strips to make lattice.
- I like turn my pie plate upside down on a piece of parchment paper and use a pencil to draw around the edge. Then turn the parchment paper over (with the pencil marking down) and use the circle as a guide for making my lattice top. You can be as simple or as fancy as you want to be with this. I like to cut varying widths of dough and sometimes I braid a couple. You have plenty of dough to get as creative as you wish. Once you have all your lattice strips prepared, lay them out over the parchment paper and weave them together. Once you are happy with your design, transfer the parchment paper to the refrigerator and let it chill until it's ready to use.
- Stir blackberries (2 cups), sugar (⅔ cup/133g), flour (3 tablespoons/24g), lemon juice (1 tablespoon/15mL) and vanilla (1 teaspoon) together lightly mashing some of the blackberries. Then mix in the cherries (2 ½ cups, pitted and chopped).
- Spoon the filling into the crust, discarding leftover juices in the bottom of the bowl. Place the small, cut pieces of butter (1 tablespoon/14g) on the top of the blackberry/cherry mixture. Place lattice on the top of the pie and crimp edges together.
- Whisk together one egg and one tablespoon milk. Brush over the prepared pie crust and sprinkle with coarse sugar, if using.
- Allow pie to chill in the refrigerator while the oven preheats.
- Preheat the oven to 375°F.
- Once oven is to temperature, place chilled pie in the oven to cook for approximately 1 hour and 15 minutes; checking the pie about 30-40 minutes in. If the edges of the crust are browning too quickly, cover them with pie shields for the remainder of the baking time.
- The pie will be finished when the crust is golden and the filling is bubbling.
- Let the pie cool a minimum of 4 hours at room temperature before serving, allowing the filling to thicken.
Notes
Nutrition
The nutrition information is based on third-party calculations, is an estimate only and may not be entirely accurate. Actual nutritional values will vary based on brands used and portion sizes.


Leanne @ Crumb Top Baking says
This pie looks lovely Tasia! I love blackberries and cherries together in a smoothie, so I know I would love them all sweet and jammy in a pie! And thanks for the shout out on my cherry galette! Appreciate it!
Tasia says
Thank you Leanne! I love the blackberry and cherry combo. I bet it's so good in a smoothie!!
Sheila Cannon says
I had fresh cherries and blackberries and needed to take a dessert to a BBQ. I searched the web and found Tasia's recipe for Blackberry Cherry Pie. It was great and I got a lot of compliments. And, it wasn't runny!
I loved that she shared a few tips that I didn't know, like tracing my pie plate on parchment paper and laying out my lattice strips for the pie top on it. Then chilling it and transferring it to the pie. Genius!
Thanks, Tasia!
Tasia says
Hi Sheila, thank you for coming back to leave a comment. I'm so happy to hear this pie was loved and the tips for making it were helpful!